9.9.14

Review: Benefit They're Real! Pushup Liner

So, a few months ago I wandered into Sephora in search of a new liquid eyeliner. I had been using an Eyeko one that I liked a lot, but towards the end of its life, the brush got all wonky and I couldn't get a precise line. I decided I was done with the felt-tip liner and wanted to go back to a brush applicator. 

Surprisingly... nobody wants to make that anymore except like NYX... which they don't sell at Sephora. So I asked the nice saleslady for a recommendation. And she pointed me to Benefit (a company I find to be mostly miss with occasional hit). She had me play with the liner, showed me how dynamic this rubber applicator is. The gel comes out of the middle, so its always even! She even tried to tell me that its impossible to get off at night, thats its only drawback, and then pushed the $18 eyemakeup remover. I declined and she said "I'll see you back tomorrow!" (spoiler alert: my cleanser and my towelettes take it off with no problem).

thanks to vampy varnish for letting me steal your picture
http://www.vampyvarnish.com/2014/05/benefit-theyre-real-push-liner
Ok, so I get it home and I try it out. There's a huge learning curve with this thing. First of all, it takes about 1,045 turns to get the liner flow started. Then, using a rubber tip to apply a gel... is tricky. It took me a few weeks to figure out how to vary the weight of the line. And even longer to figure out how to use the sort of wedge shape of the applicator to make wings. 

They claim that its one click per eye to use. What they don't tell you, is that you've got to smudge and work the liner around a lot in order to make it one click per eye... and you don't get a precise, dark black line when you only do one click. I've found two or three gets the dark line that I want. But here's the rub... I can't seem to get a razor thin, precise line. It never gets narrower than a few millimeters, which is frustrating if you're trying to go for something a little more subtle. The applicator also gets covered in gunk, which is hard to get off without squeezing product out of the middle and wasting some. 

I will say, its extremely long lasting. I've worn it two days in a row with almost no problem, and I swam in the ocean with it, and it stayed on. The applicator claims to be revolutionary because you can get super close to the lashline... I still had to lift and stretch my eyelid to get it right next to my lashline... which I have to do with every liner. So, getting liner next to your lashes is about skill, not applicator. I could see it being useful for doing retro/vintage looks, because the line is thick and dark, but its not a great daily use. The staying power might be great for people with oily lids where makeup just slides off. I could see that being a plus, but oily lids are not an issue for me. I probably won't rebuy, but I may keep it around. 


thanks makeupandbeautyblog.com for letting me steal your picture
http://www.makeupandbeautyblog.com/wp-content/uploads/2014/05/Benefit-Theyre-Real-Push-Liner-1.jpg
PS: photoshop trickery on the packaging. see those three eye images? claiming that the liner makes your eyes look bigger? look close at the iris size of the third compared to the first two. it looks bigger because it IS BIGGER. More proof? look at the corner of the eye on the bottom and the edge of the frame, compared to the same corner above on the other two. Its a zoomed in photo that they were hoping we wouldn't notice.

I'm really going to try. I plan to do reviews on Tues/Weds and then looks on Fridays. Thats sorta the current plan. I also intend to take my own pictures, apologies to the bloggers that I stole from, I'll happily take them down if you're upset. I just didn't have the product with me at work. Also, everyone totally needs to see my applicator covered in gunk.

23.9.13

A Classic Look...

So I felt like a classic simple eye (yeah right like I can actually do anything simple) and a bright red lip today. This is what I came up with...

Eyes
Crease: Inglot Matte Dark Brown
Lid: Inglot shimmer taupe
Inner Corner: Inglot light yellow shimmer
Browbone: Inglot gold shimmer

Liner: NYX black liquid liner
Mascara: Smashbox Hyperlash

Waterline: Sephora mini eyeliner pencil in white, layered with Sephora white eyeshadow.

Face
Primer: TooFaced Primed and Poreless
Foundation: Makeup Forever Mat Velvet - Mattifying Foundation
Powder: Inglot face powder
Blush: Smashbox softlights some sorta light pink

Lips
Primer: TooFace Lip Insurance
Liner: Sephora mini lip pencil in red
Lipstick: Sephora Cream Stain in Always Red

I love this lipstick because it stays put, especially when layered over liner and TooFaced lip insurance. I did really try to keep the eye simple... but its me, so it came out more complex than normal. Also, sorry I don't know the numbers of the Inglot shadows...

I took these photos late in the day and I'm very impressed that the white shadow stayed on my waterline all day. I use Urban Decay De-Slick Setting spray as well.

I like this look because its very versatile, especially if you keep the lip simple during the day and only crank it up at night for party time. I mostly used a sheer red lipgloss from Toki Doki while I was at work.

Don't forget to follow me on Twitter! Because I totally tweet more than I update this (not).

30.5.13

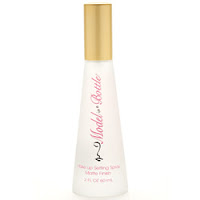
Day Long Review: Model in a Bottle Setting Spray

So, I never made a post about my trip to IMATS. Between moving and working, there just wasn't time. 

But one of the things I bought was Model in a Bottle setting spray, matte finish. I'd remembered hearing about it somewhere, and couldn't remember if it was good or not, but it was relatively inexpensive so I decided to buy it. 

I used it the day after IMATS for the first time. This shit BURNS when you spray it!!! What the hell is in it??? Clearly a ton of alcohol. And it makes your face kinda tacky, like my hair was sticking to my face, not for long, it does dry, but its weird.

So I've been using it since IMATS. Pretty much every day. And I've been breaking out a lot more. So, today, I'm making a day long review where I really pay attention to how it looks. 

8:30 AM 
Just sprayed for the first time today. You put it on after all your makeup, making sure that your mascara is completely dry. It burns your face. And also, the sprayer BLOWS. no matter how far away you hold it from your face, you can't get a nice even mist. You'll end up spraying it 8-9 times to get even coverage. Insert whatever TWSS jokes you want. It has an odd finish, once it dries and your hair doesn't stick to your face anymore. Being no stranger to spray mount, it feels a little like that. Kinda rough. It also does not give the best matte finish, despite claiming it does. Aside from a bit of color correction, this has not been photoshopped. Look at the shine on my nose!


11:50 AM
Three hours+ into my work day. And its a hot one today, although I'm in an air conditioned office. Aren't florescent lights lovely. I am totally a corpse.... Anyway, its holding my makeup on pretty well, despite the fact that my skin looks like a leather handbag... ugh. But thats the fault of my primer (just bought some new stuff, expect a review next week). I can feel the oil on my nose, forehead and chin (T-zone area) starting to bleed through, despite the fact that my cheeks feel a bit stiff and dry (they're not, its just the SHITTY finish of the setting spray). I'm already in the habit of being super aware of NOT touching my face, but with this stuff on, I feel like any touch will just wipe the makeup right off. The overexposure you're seeing in the picture on my nose is not really shine, or at least not much. Just low-quality iPhone camera combined with bad office lighting. There is a bit of shine though. And there will be more by the end of the day I expect.

1.5.13

Smokey Wednesday

I was in a hurry this morning. Went for a run that ran long. Ha! Smokey eyes are easy to do in a hurry, thats why I like them. Lots of shadows to hide your mistakes! Sorry for the picture quality. The lighting in my office is so freaking terrible and I don't have time to photoshop the hell out of these today. 

Eyes
Base: Two faced Shadow Insurance, NYX Jumbo Eye Pencil... the black one, dunno what the name is.
Outer corner: Inglot sparkly neutral (sorry, at work and I don't know remember the number)
Inner Corner: Urban Decay Naked 1, Sidecar
Crease and Lower Lid: Inglot matte chocolate brown
Liner: Kat Von D liquid in Puro Amor, Urban Decay 24/7 Eye pencil in Perversion, set with black shadow
Mascara: Smashbox Hyperlash mascara in jet black


Face
Primer: Cover FX primer for Oily skin
Foundation: Makeup Forever Velvet Finish foundation
Concealer: MAC something or other (sorry, again at work and I don't remember, its in a squeezy tube)
Powder: Inglot Powder
Blush: Inglot Bronzer/Blush

Lips
Kat Von D lipgloss in Rocker


Hey, two posts two days in a row! Go me!!! 

30.4.13

Ion Color Brilliance - Review


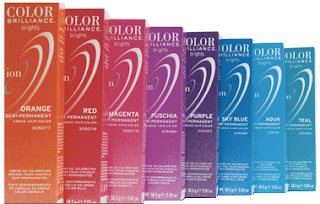
So, I've been obsessed lately with being a redhead. I'm a brunette normally, and last year I wanted to be as light as brunette as possible without going blonde. This year: its RED. I want like Ariel Little Mermaid red. A good friend, who like me has been altering her hair color for many years, suggested I try Color Brilliance Brights by Ion. Its semi-permanent, and requires no mixing of developer or any of that jazz. Its also ammonia free, so you can store it if you don't use the whole tube, and its also not hell on your hair. 

This was my first attempt:
Not so bad, considering its just going on top of mostly natural hair. But I definitely missed a huge swath right on the side, and it washed out pretty quick. It was bright, for sure, but not quite the red I was looking for.


My friend agreed to help me. We decided to lighten the roots, and then put lightener through the rest of my hair to help it blend (since it was previously lightened back when I had a professional taking care of this). We ended up pretty much bleaching the roots to blonde, and the rest to a lighter brown. My poor hair. So dry and fried.... But behold! Getting closer. It was pretty pink on the top, fading to exactly the shade of red I wanted on the bottom. But... motherfucking dye washed out EVEN FASTER. Within a week, the blonde bits on top were peeking out.

It always looked worse in my head than it actually did, but it was very annoying. Especially since apparently my hair grows at the speed of LIGHT and my nice dark brown roots were starting to show. Even more so now as I write this, three weeks later. 

So I took matters into my own hands. My friend had trouble getting two tubes of the straight red dye to get all the way through my hair. So, I bought two tubes of the straight red, and then a bottle of a more natural red from a different line of Ion colors to mix with it. 


Well! I FINALLY got closer to that rich firey red that I wanted. This image is just after rinsing (and turning my shower into something resembling a murder scene). It was very pretty. And I was very happy. It was still a bit pink on top (due to the bleach halo I will soon have around my head as it grows out), but I can tweak the formula enough to make it happen. 


Well, I've started washing only every other day. And i redid this hair once about five days after I did it, and haven't redone it since (so, I'm on 11 days, maybe 4-5 washes?) And this is what it looks like today. See all that lovely bleachy blonde? Ugh. For all that, it doesnt' look that bad when I wear it down. And in sunlight it blends very nicely. But this red... man, it just WILL NOT stay in!

It might be time for this gal to bite the bullet and just pay somebody to fix all the mess that it currently is. Or I might bleach the shit out of all of it and go for blue. I've always wanted to have blue hair, just for a bit. And I feel like before I turn 30 is the time to do that. But I fear the bleach.... my poor hair... :)

So, I guess my review of the Ion Color Brilliance Brights is.... yeah, they look freaking great for about two days. Then shit washes out. And fades. I mean, I was leaving this stuff in for like an hour at a time in hopes of making it stay in for longer. AND I used their color sealant, AND color sealing moisturizing treatment afterwards. I washed it this morning, there was still color coming off. And I use color safe shampoo and conditioner. So, as much as I'd like to do a blue with the same stuff, I fear that I'd just end up blondish-gray after a week. I'm used to hair dye not holding in my hair. Its always been that way. But... a noticeable difference after each wash? Seems a little ridiculous. It is super easy to use, and comes off your skin pretty easily, with a little scrubbing, and its not harmful to hair really, since its ammonia free. So, I guess I hesitantly recommend it, if you don't mind weekly touchups.

Went to IMATS. Did not plan for it well, and so I pretty much bought anything and everything that caught my eye. Eesh. I was pretty broke for a while, ha ha. I have pictures ready... just haven't posted them yet. In the process of moving from my apartment into a house, so haven't had a lot of time. I will post them as soon as I can. 

Don't forget to follow me on Twitter for extremely sporadic updates!!

7.2.13

Makeup Forever Profinish Foundation

Gotta write this quick, because I have shit to do at work...

I finally ran out of the Gorgeous Cosmetics foundation that I got at IMATS last April. Pretty impressive that it made it almost a year. I will definitely be buying more of it this year.

I had a sample of Makeup Forever's new ProFinish lying around that I got a Sephora a few weeks ago. I've been hesitant to try it, as #1 they didn't have a color that matched me correctly, so they gave me two different ones to mix and #2 a convertible foundation where the dry application is the full coverage? Wha?

So in a hurry this morning, I gave it a whirl. Neither color works well on me, the dark being too dark and yellow, the light being waay too light and pinkish. Blending them was also a bit tricky, as the dry application sets up really fast. But... damn! The coverage! Seriously! I barely had to use any concealer afterward, and I enjoyed that there wasn't a need to set it with powder. I did set my Mac concealer with a bit of translucent powder, just to make sure it stayed put, but then blush and a final hit with setting spray and I was done. I dislike the sponge applicator, but I can't see how I'd use either my fingers or a brush to apply it dry. Its possible that the full size sponge might be better, but its still a damn sponge. Still soaks up oil. 

I've had it on for about two hours now, and my face still looks pretty matte, and the coverage is pretty outstanding. Again, you'll have to forgive the corpse like lighting in my office. I'm working on getting a shade and a desk lamp so I'll look more like a human. I'll update later in the day when I have time to do so. If anyone has any experience with this new stuff, please let me know. Or go to Sephora and ask for a sample and try it yourself!


UPDATE 2:12pm: Foundation holding strong in most of my oil prone areas (forehead, cheeks, chin). Nose too, though not as well. It still looks matte for the most part, but i'm starting to see the oil seep through. I can't find my stupid blotting papers, or I'd take care of it. But it seems like this foundation might actually be good for something. So thats cool.

25.1.13

This was going to be a how to...

...but my makeup is nothing to write home about today, ha ha.

Instead I will mention that I went out last night for beers at a super cool place called Pub Dog in Columbia, MD. They have a great and cheap beer special, which I took full advantage of and am now suffering a teeny tiny aftermath. New job requires me to get up at 5am in order to be at work by 8am (since as a beauty addict I have to have perfect and unique makeup every day and it takes time). So I went to bed last night around 12:30, and got up at 5. Note that that is not a lot of sleep. My eyes weren't puffy or anything, but I was having trouble keeping them open all the way, and they're still kinda red. So I decided to whip out what I'm told is a drag queen tip, white eyeliner on the waterline, set with white eyeshadow. I extended past both the inner and outer corner to get a little panache as well. (Do I get bonus points for the word panache?) I also used a bright blue/purple under the lashline, which helps make the whites of your eyes look whiter, giving you more of a bright-eyed and bushy tailed look. Between the white liner and blue shadow, you can't really tell that I only got 4.5 hours of sleep, right?

Again, apologies for the office lighting and my work computer built in camera, both conspire to make me look very dead-alive. I also ran out of my Inglot powder, so I'm using some bullshit Maybelline crap. Its from the FIT collection and it sucks, don't buy it.


In case anyone wants to know, stuff I'm wearing on my face is:

eyes: inglot shadows (sparkly darker taupe, lighter matte taupe and sparkly dark purple in the crease), MAC shroom on my browbone, NYX liquid eyeliner, Smashbox mascara (which i epic failed in putting on today, i have crazy spider lashes ha ha), Sephora white eyeliner mini on the waterline, set with a shimmery Sephora white shadow
face: UD setting spray, CoverFX primer, Gorgeous cosmetics foundation, UD concealer, Maybelline FIT powder, MAC blush in Rhubarb, UD setting spray again

lips: UD Pocket Rocket lipgloss in James

Tutorials will happen. I will make it happen. I want to finish my color relationships series, and I want to make a Game of Thrones series as well. I filmed one tutorial in my Game of Thrones series, but I haven't edited it yet, because... well, i'm lazy. Ha ha. Happy Friday everyone!