
Hey, real quick!!
OCC (Obsessive Compulsive Cosmetics) is giving you the 20% IMATS discount (the same one I paid $40 in travel and $30 in admission to get!) through 4/17/11!
Login with username: OCCDISC and password IMATSNYC (case sensitive!)
I recommend the lip tar and any of the eyeshadow pigments. Wicked awesome!
15.4.11


14.4.11
Hair curling!
 OMG! Two posts in as many days... go me..
Last night I got it into my head that I wanted curly hair today. This is always a struggle with my stick-straight ultra-fine hair. I remembered having success as a kid with squishy foam rollers that you wear overnight. So I ran out to Target and bought these:
I put them in last night around 1am, in completely wet hair, then went to bed around 3am. I slept very poorly and woke up around 1pm. The rollers had been in for roughly 12 hours. The little fuckers were still slightly damp. I left them in for about an hour after getting out of bed, and aimed a hair dryer at a few of them, in hopes of drying them further. It was super curly when I first took them out. Its now been about three since I took them out. Here is my hair:

I'm actually pretty happy with the results. Its bouncy and voluminous and full of lovely texture. But I predict in about two hours it'll be back to straight. God damn my hair! Maybe I should just get a perm and be done with it.. ha.
12.4.11
Twitter! IMATS!
So... I got a twitter for this blog. You can follow me! @vortexofsin Yeah, that's about it. I feel dumb. I've railed against Twitter for a long time now. And I'm still not sure I'll use it, but, hey, hopefully it'll get me some more followers on here.
Recent news: Me and two friends decided to go to NYC for IMATS! That is, the International Makeup Artist Tradeshow. We had SUCH a blast. I got a TON of stuff for waaay cheap.
Purchase 1. Eye Kandy
 The top three are Sprinkles Glitter (left to right), in Gumball (deep purple), Semi Sweet (royal blue) and Honey Drop (gold). The bottom three are mineral shadows in Sweet Pea, Creamsicle and Peppermint. I swatched them with mixing medium and without in each color (the glitters don't really work without mixing medium). As a special IMATS deal, they were 6 for $40 and included a brush and their "Liquid Sugar" mixing medium. They claimed it was water based, but the lady got a bit in my eye when she was demonstrating on me and it BURNED. Probably because the second ingredient is alcohol (the first is indeed water). I like them... but I kinda wish I'd gone the route of my friend who just bought one color for $5. The brush included with the kit is garbage. Its just a little kids paint brush, very chinzy. After the first use it won't go back to its original pointed shape. And as shiny as the glitters are, I do not need that much glitter... The gumball shade is missing the little plastic liner dispenser that allows you to tap out just a little at a time, so basically I have a tiny jar FULL of very fine purple glitter. I can predict this will end well... All that being said, I'm very fond of the mineral shadows, they're metallic and look very lovely. I like that there's no metal in anything, its all very fine plastic.
Purchase 2. Brushes from Royal & Langnickel

Not super exciting, except that they were cheap. And seem to be good quality. And fairly reasonable on the website too. I got a concealer, big eyeshadow, powder and kabuki brush all for $26. The kabuki brush is just about the softest thing I've ever felt. I used it today to put on my powder, great coverage, not too much product wasted. I'm actually quite pleased with these, and will probably continue to buy from their website. I swore I'd never go back to buying "makeup" brushes when art brushes work just as well, but these seem very reasonable.
Purchase 3. Obsessive Compulsive Cosmetics

I bought OCC Lip Tar in Memento and Pure Pigment in Ultramarine Blue. Both of these are INSANE pigmented. The lip tar is really really thick and could be used as a cream blush as well. I will use it very sparingly as its SUPER thick, and once its set, behaves like a stain. It stays put (even after eating Sonic yesterday). I'm scared to death to actually try the Pure Pigment. It can be used for anything, though I'll be using it mainly as an eyeliner. But the shit is BRIGHT. I swatched it both just as loose powder and with the Liquid Sugar mixing medium. The sheer powder is eh. Doesn't seem to have great coverage, but I used a q-tip to swatch it, AND my hands are really lined. But with the mixing medium... whoa. One drop swirled with some product in the cap and I suddenly had tempera paint. Its about that consistency and color. Holy crap. I can see this being some AWESOME liner and probably a great shadow too, if I can get the right consistency to blend it. Running my finger over the swatch now, it does seem to smear a bit, but maybe if i dilute it with enough mixing medium it might be better. I'm excited, and scared. The brush I used to swatch it came clean... mostly, but I had to use soap and water (I know, bad me, but it was an old brush). It also came completely off my hand with soap and water, which is more than I can say for the lip tar which really wants to hang on... good!
Purchase 4. Inglot

Omg. Inglot. This company was pretty much the reason I went to IMATS. Inglots used to be only available in Inglot stores. And up until recently the nearest Inglots store to me was Las Vegas. They now have stores in New Jersey and New York, AND online! They have this freedom system, where you custom create your own palettes. They have round and square (round is slightly cheaper, but you may as well pay the extra few bucks for square since there's more product). You can buy eyeshadow in 2, 3, 4, 5 or 10. Same (or almost same) goes for lips, eyebrows, blush and concealer. You can buy powders in 2's. And they're freaking stackable with the little super powerful magnets in the corners. Or you can just have the lid which is also magnetic. I'm not finding the powder, blush, eyeshadow palette online, so that may be only in stores, or only to pro's (like at IMATS) or something, but I'm glad I bought it. The shadows are SUPER pigmented for being pressed shadows. The orange-y/gold shade is SO beautiful. The white/yellow shade is very similar to Kat Von D's Sugar Skull out of my Memento Mori palette, which is awesome since that shade's only available in sets. And the pans are huge. It'll take me forever to go through these. But I haven't talked about the powder. That powder is the best powder bar none. Its fucking great. I put my makeup on about 12 hours ago and I'm only just now seeing a bit of shine on my nose. I can't recommend it enough. Love love love. I want to buy everything they have. Like now. I almost wish they didn't have an online store so I wouldn't spend all my money.
Guess that's it. I'm unemployed now, so hopefully that means posting more. Don't forget to follow me on twitter! Ha!
Recent news: Me and two friends decided to go to NYC for IMATS! That is, the International Makeup Artist Tradeshow. We had SUCH a blast. I got a TON of stuff for waaay cheap.
Purchase 1. Eye Kandy
 The top three are Sprinkles Glitter (left to right), in Gumball (deep purple), Semi Sweet (royal blue) and Honey Drop (gold). The bottom three are mineral shadows in Sweet Pea, Creamsicle and Peppermint. I swatched them with mixing medium and without in each color (the glitters don't really work without mixing medium). As a special IMATS deal, they were 6 for $40 and included a brush and their "Liquid Sugar" mixing medium. They claimed it was water based, but the lady got a bit in my eye when she was demonstrating on me and it BURNED. Probably because the second ingredient is alcohol (the first is indeed water). I like them... but I kinda wish I'd gone the route of my friend who just bought one color for $5. The brush included with the kit is garbage. Its just a little kids paint brush, very chinzy. After the first use it won't go back to its original pointed shape. And as shiny as the glitters are, I do not need that much glitter... The gumball shade is missing the little plastic liner dispenser that allows you to tap out just a little at a time, so basically I have a tiny jar FULL of very fine purple glitter. I can predict this will end well... All that being said, I'm very fond of the mineral shadows, they're metallic and look very lovely. I like that there's no metal in anything, its all very fine plastic.
Purchase 2. Brushes from Royal & Langnickel

Not super exciting, except that they were cheap. And seem to be good quality. And fairly reasonable on the website too. I got a concealer, big eyeshadow, powder and kabuki brush all for $26. The kabuki brush is just about the softest thing I've ever felt. I used it today to put on my powder, great coverage, not too much product wasted. I'm actually quite pleased with these, and will probably continue to buy from their website. I swore I'd never go back to buying "makeup" brushes when art brushes work just as well, but these seem very reasonable.
Purchase 3. Obsessive Compulsive Cosmetics

I bought OCC Lip Tar in Memento and Pure Pigment in Ultramarine Blue. Both of these are INSANE pigmented. The lip tar is really really thick and could be used as a cream blush as well. I will use it very sparingly as its SUPER thick, and once its set, behaves like a stain. It stays put (even after eating Sonic yesterday). I'm scared to death to actually try the Pure Pigment. It can be used for anything, though I'll be using it mainly as an eyeliner. But the shit is BRIGHT. I swatched it both just as loose powder and with the Liquid Sugar mixing medium. The sheer powder is eh. Doesn't seem to have great coverage, but I used a q-tip to swatch it, AND my hands are really lined. But with the mixing medium... whoa. One drop swirled with some product in the cap and I suddenly had tempera paint. Its about that consistency and color. Holy crap. I can see this being some AWESOME liner and probably a great shadow too, if I can get the right consistency to blend it. Running my finger over the swatch now, it does seem to smear a bit, but maybe if i dilute it with enough mixing medium it might be better. I'm excited, and scared. The brush I used to swatch it came clean... mostly, but I had to use soap and water (I know, bad me, but it was an old brush). It also came completely off my hand with soap and water, which is more than I can say for the lip tar which really wants to hang on... good!
Purchase 4. Inglot
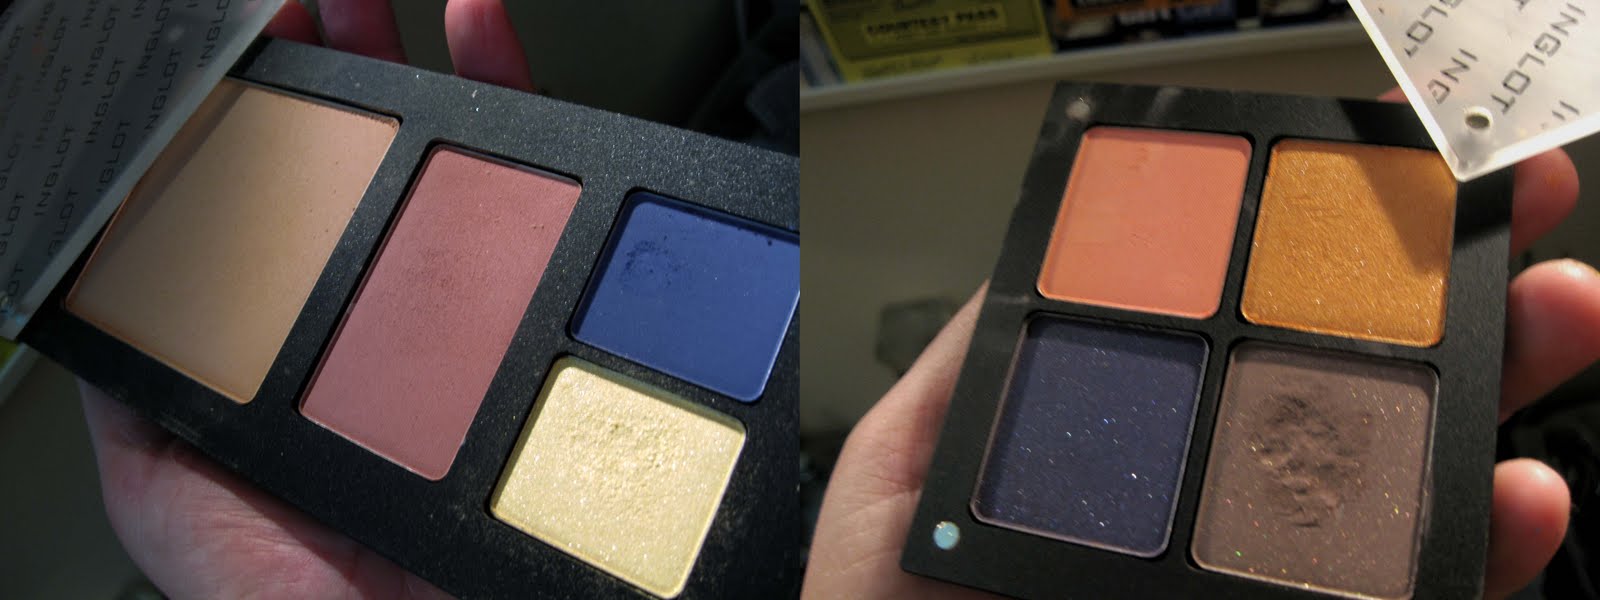
Omg. Inglot. This company was pretty much the reason I went to IMATS. Inglots used to be only available in Inglot stores. And up until recently the nearest Inglots store to me was Las Vegas. They now have stores in New Jersey and New York, AND online! They have this freedom system, where you custom create your own palettes. They have round and square (round is slightly cheaper, but you may as well pay the extra few bucks for square since there's more product). You can buy eyeshadow in 2, 3, 4, 5 or 10. Same (or almost same) goes for lips, eyebrows, blush and concealer. You can buy powders in 2's. And they're freaking stackable with the little super powerful magnets in the corners. Or you can just have the lid which is also magnetic. I'm not finding the powder, blush, eyeshadow palette online, so that may be only in stores, or only to pro's (like at IMATS) or something, but I'm glad I bought it. The shadows are SUPER pigmented for being pressed shadows. The orange-y/gold shade is SO beautiful. The white/yellow shade is very similar to Kat Von D's Sugar Skull out of my Memento Mori palette, which is awesome since that shade's only available in sets. And the pans are huge. It'll take me forever to go through these. But I haven't talked about the powder. That powder is the best powder bar none. Its fucking great. I put my makeup on about 12 hours ago and I'm only just now seeing a bit of shine on my nose. I can't recommend it enough. Love love love. I want to buy everything they have. Like now. I almost wish they didn't have an online store so I wouldn't spend all my money.
Guess that's it. I'm unemployed now, so hopefully that means posting more. Don't forget to follow me on twitter! Ha!
31.12.10
Foundation Review: The Search Continues!
I just read the post before the one I just put up, and realized I promised a foundation review and never put it up.
Well... this past summer I tried mineral foundations. I tried Pur (available at Ulta) and Bare Minerals (available and Sephora, Ulta, Bare Minerals stores and probably other places too). Bare Minerals did not live up to its hype. I mean, it was good and stuff, but didn't really stay put the whole time. I bought the starter/trial size kit which gives you their mineral foundation in original and matte, the mineral veil and the bronzer/blusher thingy called warmth. I could have told them that I would never want the "original" foundation and would almost inevitably always want the matte, but whatevs. I liked the matte a lot, it was more effective for my oily skin in this humid-ass city. I liked the mineral veil too, but there wasn't enough of it in the trial kit to cover going through both the matte and original foundations. The "warmth" was good, but I'm so red naturally that I barely needed any of it, so I have tons left. In the end, I was impressed, it mostly stayed put. But the shit's so expensive that I thought I could probably do better doing my regular summer routine (primer, concealer, powder). All in all, I'll recommend it, but only if you feel like spending the money.
The other mineral foundation I tried was PurMinerals 4-in-1 pressed mineral makeup in Blush Medium. I'd read some reviews online of PurMinerals and they seemed much more positive than the stuff about BareMinerals. People were saying it worked as well, if not better and was much more economical. Yeah, stuff was still $37. The saleslady at Ulta recommended that I get the full size of just the foundation instead of spending more on the starter kit, since the foundation is 4-in-1. I had bought the PurMinerals primer already, since I was anticipating trying this, so I was all set. I liked that it was pressed, it felt like less of the product got wasted on the way from the container to my face. It comes with a sponge, that I used only rarely when I had dark circles or something like that. Sponges = bad, they spread bacteria. I had quit using it when the weather got colder, but I've recently come back (after I had a series of breakouts and wanted to put less crap on my face) and discovered I like it again. I dunno, I'm still not thrilled. I do like that it comes in a ton of shades (many more than BareMinerals) and they have different shades not just for light/dark, but for yellow/pink/olive as well. Which made my Scottish ruddiness happy. The shade I picked in the summer is a hair too dark for my untanned winter face, but I blend it down on my neck and all's well, no orange foundation lines. It stays put when I layer it over Dr. Brandt's Pores-No-More and provides pretty good coverage.
In the end though... my search for perfect foundation continues. I recently discovered that Urban Decay makes a few sprays that are highly recommended on Sephora for keeping makeup on oily skin, so I'm going to have to check them out. I also heard about Skindinavia makeup setting sprays. My youtube makeup guru xsparkage also says you should be using a translucent powder as well as a regular powder. Fantastic. More things to spend money on and layer on my skin! Ha ha. Happy New Year everyone!!
Well... this past summer I tried mineral foundations. I tried Pur (available at Ulta) and Bare Minerals (available and Sephora, Ulta, Bare Minerals stores and probably other places too). Bare Minerals did not live up to its hype. I mean, it was good and stuff, but didn't really stay put the whole time. I bought the starter/trial size kit which gives you their mineral foundation in original and matte, the mineral veil and the bronzer/blusher thingy called warmth. I could have told them that I would never want the "original" foundation and would almost inevitably always want the matte, but whatevs. I liked the matte a lot, it was more effective for my oily skin in this humid-ass city. I liked the mineral veil too, but there wasn't enough of it in the trial kit to cover going through both the matte and original foundations. The "warmth" was good, but I'm so red naturally that I barely needed any of it, so I have tons left. In the end, I was impressed, it mostly stayed put. But the shit's so expensive that I thought I could probably do better doing my regular summer routine (primer, concealer, powder). All in all, I'll recommend it, but only if you feel like spending the money.
The other mineral foundation I tried was PurMinerals 4-in-1 pressed mineral makeup in Blush Medium. I'd read some reviews online of PurMinerals and they seemed much more positive than the stuff about BareMinerals. People were saying it worked as well, if not better and was much more economical. Yeah, stuff was still $37. The saleslady at Ulta recommended that I get the full size of just the foundation instead of spending more on the starter kit, since the foundation is 4-in-1. I had bought the PurMinerals primer already, since I was anticipating trying this, so I was all set. I liked that it was pressed, it felt like less of the product got wasted on the way from the container to my face. It comes with a sponge, that I used only rarely when I had dark circles or something like that. Sponges = bad, they spread bacteria. I had quit using it when the weather got colder, but I've recently come back (after I had a series of breakouts and wanted to put less crap on my face) and discovered I like it again. I dunno, I'm still not thrilled. I do like that it comes in a ton of shades (many more than BareMinerals) and they have different shades not just for light/dark, but for yellow/pink/olive as well. Which made my Scottish ruddiness happy. The shade I picked in the summer is a hair too dark for my untanned winter face, but I blend it down on my neck and all's well, no orange foundation lines. It stays put when I layer it over Dr. Brandt's Pores-No-More and provides pretty good coverage.
In the end though... my search for perfect foundation continues. I recently discovered that Urban Decay makes a few sprays that are highly recommended on Sephora for keeping makeup on oily skin, so I'm going to have to check them out. I also heard about Skindinavia makeup setting sprays. My youtube makeup guru xsparkage also says you should be using a translucent powder as well as a regular powder. Fantastic. More things to spend money on and layer on my skin! Ha ha. Happy New Year everyone!!
Personalized Face Charts
So, I saw this video and thought it was a fantastic idea. Especially since right now I'm trying to plan the perfect NYE makeup scheme. I found the site that Leesha (the girl in the video who's my favorite YouTube guru) recommended. Here it is. I took a photo with my webcam. It took several tries to get it right. Then I right-clicked and saved the picture (you don't have to pay for the full size one, just swipe the preview) then dropped it in Photoshop, played with the levels a bit, cropped it and then erased all the excess crud from my face. You want just an outline of everything. I even had to pretty much put in my waterline because it didn't turn out in the picture. If you don't have photoshop, uh.. I dunno. Use other photoediting software? Beg me (or someone else with photoshop) to do it?
Tips for taking the photo:
 Original photo. Lovely isn't it.
 Exported image from that website
 Final image after cropping, erasing and playing with the contrast settings. I also filled in my eyebrows for shits and giggles. And not very well.
I was going to make the product chart too, but eh. I'm going to print it on 8.5x11 card stock, which I have around somewhere. If you print, you shouldn't print on regular printer paper, some kind of heavier cardstock is required. But I wouldn't think that 90# watercolor paper (as stated in the video) is all that necessary. You could do 65# or 67# vellum bristol (which you can probably buy by the sheet at your local kinkos, or whatever cover weight they happen to have in white) Pretty much just make sure its a heavier-than-normal paper and that its as white as you can possibly get.
Happy New Year everybody! I will do my best to post more. I have two companion looks coming up and a few reviews. And I always say that, and then never post. But I'll try to do better in the new year.
Tips for taking the photo:
- If you have a Mac and use your iSight camera, turn the flash off (instead of clicking the camera button to take the picture, hit CMD+SHIFT+T to take it without flash)
- The video says no makeup, I tried that a few times and couldn't get my lips to show up well. So i grabbed a light colored eyeliner (L'Oreal Kohl eyeliner in Cloud) and just lightly traced the top of my lip and the bottom. Just enough to provide contrast between my skin and my lips. I tried it before I washed off my eyeliner and mascara and the results weren't super successful either, so I washed it off and my eyes came out better.
- Do not make any kind of face or pose in anyway. Just look straight at the camera and deadpan.
- Do not be surprised if you discover a biological flaw you didn't notice before. I just discovered that my left eyelid is larger than my right. Ha! Probably because my eyes are funny shaped due to my astigmatism.
 Original photo. Lovely isn't it.
 Exported image from that website
 Final image after cropping, erasing and playing with the contrast settings. I also filled in my eyebrows for shits and giggles. And not very well.
I was going to make the product chart too, but eh. I'm going to print it on 8.5x11 card stock, which I have around somewhere. If you print, you shouldn't print on regular printer paper, some kind of heavier cardstock is required. But I wouldn't think that 90# watercolor paper (as stated in the video) is all that necessary. You could do 65# or 67# vellum bristol (which you can probably buy by the sheet at your local kinkos, or whatever cover weight they happen to have in white) Pretty much just make sure its a heavier-than-normal paper and that its as white as you can possibly get.
Happy New Year everybody! I will do my best to post more. I have two companion looks coming up and a few reviews. And I always say that, and then never post. But I'll try to do better in the new year.
22.9.10
Makeup Look - Rock Out Bronze

Omg. Seriously. Why don't I update this more???
Its been a long summer. And hot. I have some mineral foundation reviews coming. Promise. For realsies. (spoiler alert: bare minerals is not my fav)
Anyway, I have a new look that I made up on the spot while rushing to get to an alumni event (which had the time changed and ALL the alumni, including me, missed it. fuckers.) So I got all pretty for nothing. Oh well. I call this one Rock Out Bronze, because its late and I've been drinking and can't think of a better name. I should have taken pictures when I first did it, it would look better, but que cera cera.

Face:
- Pur Minerals foundation primer
- Flirt! correcting concealer
- Pur Minerals 4 in 1 Foundation in blush medium
- Smashbox Softlights blush in Tint

- Two Faced Shadow Insurance
- Kat Von D Memento Mori palette, the black shade (which if the names on the back of the palette line up with the shadows) in Tijuana (hereafter referred to as black)
- Ulta Eyeshadow in Plum Smoke (kind of a deep dirty gold/bronze with a slight plum colored tinge to it, got it for like $.99 on a clearance table after the holidays last year) (hereafter referred to as bronze)
- Kat Von D Memento Mori Palette, the gold/coppery color, I think its Meditation (hereafter referred to as copper)
- Kat Von D Memento Mori Palette, the bright yellow, I think its Sugar Skull (hereafter referred to as yellow)
- Kat Von D liquid eyeliner in Puro Armor
- Peter Thomas Roth - Lashes to Die for black mascara
- Maybelline Forever Color in Cocoa 210, its very matte, so if you wanna throw a gloss on top, feel free. I didn't and it looked great.
 nstructions:
- Apply the black shade in a V shape along the crease and the lash line, filling in the bottom of the "V" at the outer corner. Bring the black up a little, into the crease, but use your own judgment for a smokey look. Black's a tricky color and often is difficult to blend, so use it sparingly and always hedge on the side of too little and build up color a little at a time (I of course was in a hurry and had to work really hard to get it to blend!)
- Use the bronze color all over your lid, up to the black and overlapping a little. Use a brush with nothing on it (or in my rushed case, the brush used to apply the bronze) to really work the black and bronze together.
- Starting at the inner corner, work the copper color out till about a third of the way across the eyelid.
- Apply the yellow color on the brow bone, and a little dab with a tiny brush on the inner corner.
- Apply the bronze color in a thin sweep along the lower lash line, about 2/3 of the way, and finish up to the corner with the copper color.
- Apply black liquid eyeliner (or pencil) thinly across upper lashline, getting thicker towards the outer corner. Apply a tiny bit of the black shadow on the edges if it looks too harsh (or if you used a pencil, take a small clean brush or a q-tip and smudge it a little). Things should be blended together, but not so much as to make your eyeliner invisible.
- Apply mascara.
- Do your face however you would do it. I'm not the type who keeps a hundred shades of blush on hand, I figure one soft pink and bronzer is adequate.
1.4.10
Eyeshadow Look - Vegas Swimming Pool
 Hi! omg. two updates in two days? wtf???
 So, I came up with this look a while ago and its been a staple. It has a sister look (which I actually came up with first) called Dubai Sunrise which I will post at another time. Neither of them has much to do with the places they're named for.
Shadow:
Outer half of lid: Makeup Forever Star Powder #960 Turquoise
Inner half of lid: Flirt! Glamourazzi Palette, second color from right (I think its Showstopper) more or less a fleshtone
Outer part of crease: Flirt! Glamourazzi Palette, color on far right (I think its Golden Lady) brown that looks dark gold when its applied. I always think this is going to be darker than it
 is :)
is :) Inner part of crease & under eyes: Mac pressed shadow in Amber Lights, its a bright brassy/gold
Mascara: 2 coats Peter Thomas Roth Lashes to Die for the Mascara. Two tricks to mascara application I've learned: 1. wiggling brush side to side as you move up 2. In addition to wiggling back and forth and moving upward, rotating the brush at the same time (i know, its a lot of stuff to do), but this prevents clumping for the most part and with this brush that has two different types o
 f bristles its necessary.
Eyeliner:
Upper lid: Mac Fluidline in Blacktrack
Outer waterline: Beautique black eyeliner pencil
Inner waterline: Sephora eyeliner minis in Plum on and a little bit on the outer corner, connecting it to the upper eyeliner (you can't really see it, so probably not necessary)
Blush: Flirt! Bronzer/Blush in Sweet Desire applied to cheekbones, nose, forehead, upper lip and chin.

I didn't use foundation today, I put on my Makeup Forever primer and then used this stuff that I don't really understand that was given to me by my friend Kyle of FaceCandy called Dr. Brandt's Pores No More. I have no idea what it is. It smells kinda funny. Not bad, but still, kinda funny. The instructions say "use am after cleansing and toning. re-apply throughout the day, as necessary" Its flesh colored. And sheer when you put it on. It tends to make my powder go on wicked smooth, but I don't really know if its hiding my pores. I'm perplexed by it. But I'm almost out of foundation, so it seemed a better choice today. On top of primer and that weird stuff I put on concealer and powder and thats it.
Thanks for reading!

Up next: my search for foundations continues! Probably another day-long review.
Subscribe to:
Posts (Atom)

 Posts
Posts


